> ## Documentation Index
> Fetch the complete documentation index at: https://nayax-44d6e37b-docs-marshall-faq-redistribution.mintlify.site/llms.txt
> Use this file to discover all available pages before exploring further.
# Set Up Nayax Core for Marshall Integration
Once you have completed the Marshall installation process, follow the steps below to configure the Nayax device to support the Marshall functionality.
## Configure the Machine Model at the Machine Level
This configuration enables your system to interact appropriately with the selected devices, ensuring efficient, optimal operation.
Note that during the integration, your Nayax Integrator would be the one to set up virtual machines for you, but in case you'd like to learn how to do that yourself, below are the necessary steps to configure the machine model:
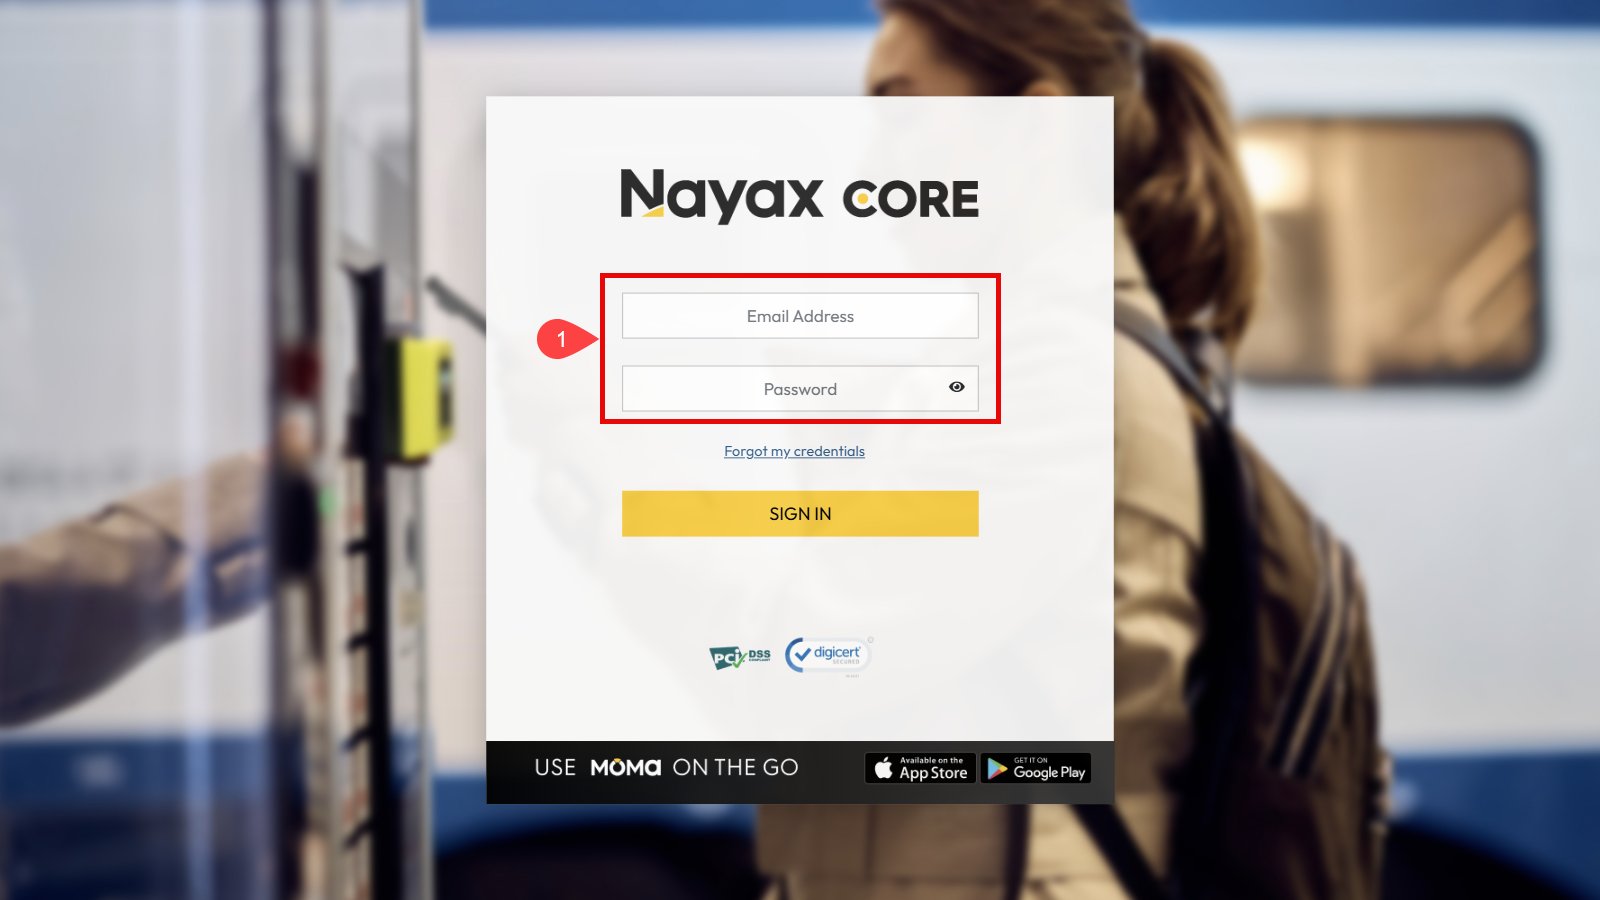
1. Log in to [**Nayax Core**](https://my.nayax.com/core/LoginPage.aspx?ReturnUrl=%2fdcs%2fpublic%2fdefault.aspx&_ga=2.5742451.1172703238.1627224233-738608359.1611493235) using your credentials.
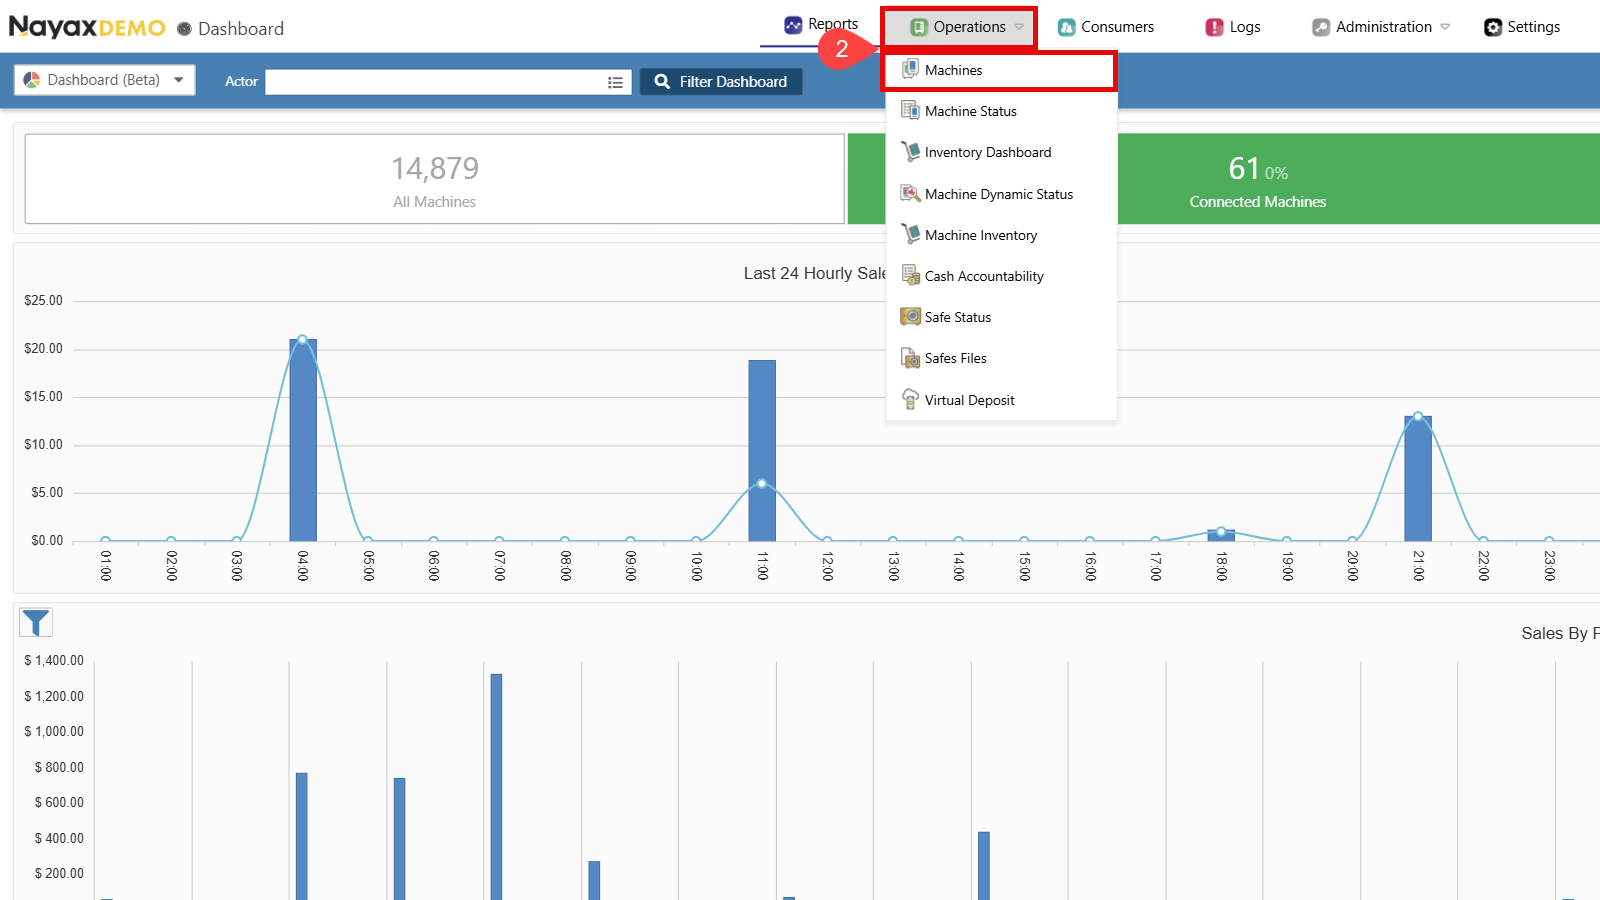
 2. Go to **Operations > Machines**.
 3. Create a machine. If you need help, see the [**Create New Machine**](/docs/manage-data-operations/lynx-api/machines/create-new-machine-guides) guide.
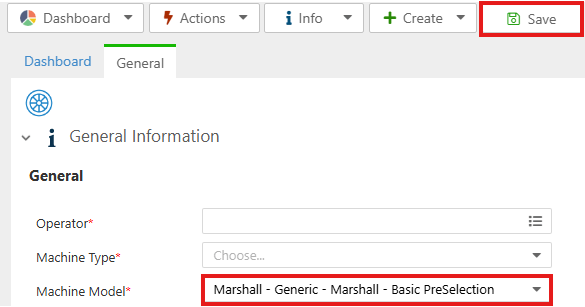
4. In the **Machine Model** field, select one of the following options from the dropdown:
For Amit:
* RS232 – PC Machine - Marshall (Amit device)
For VPOST/Onyx/VPOSM:
For PreSelection (Single-Session / Multi-Session)/ if uncertain about the flow:
* Marshall - Generic - Marshall - Basic PreSelection
Video and manual regarding the configurations relevant to Single Session:
[How to for Marshall Configurations | Single Session](https://nayax-u.nayax.com/scenario/how-to-for-marshall-configurations-single-session-54374)
Video and manual regarding the configurations relevant to Multi-Session:
[How to for Marshall Configurations | Multi-session with Pre-Selection](https://nayax-u.nayax.com/scenario/how-to-for-marshall-configurations-multi-session-with-53447)
For Always Idle (PreSelection sub-flow):
* Marshall - Generic - Marshall - Always Idle
Video and manual regarding the configurations relevant to Always Idle:
[How to for Marshall Configurations | Always Idle Pre-Selection](https://nayax-u.nayax.com/scenario/how-to-for-marshall-configurations-always-idle-pre-54427)
For PreAuthorization:
* Marshall - Generic - Marshall - PreAuthorization
Video and manual regarding the configurations relevant to PreAuthorization
[How to for Marshall Configurations | Pre-Authorization](https://nayax-u.nayax.com/scenario/how-to-for-marshall-configurations-pre-authorization-54263)
5. Click **Save** to apply the configuration.
3. Create a machine. If you need help, see the [**Create New Machine**](/docs/manage-data-operations/lynx-api/machines/create-new-machine-guides) guide.
4. In the **Machine Model** field, select one of the following options from the dropdown:
For Amit:
* RS232 – PC Machine - Marshall (Amit device)
For VPOST/Onyx/VPOSM:
For PreSelection (Single-Session / Multi-Session)/ if uncertain about the flow:
* Marshall - Generic - Marshall - Basic PreSelection
Video and manual regarding the configurations relevant to Single Session:
[How to for Marshall Configurations | Single Session](https://nayax-u.nayax.com/scenario/how-to-for-marshall-configurations-single-session-54374)
Video and manual regarding the configurations relevant to Multi-Session:
[How to for Marshall Configurations | Multi-session with Pre-Selection](https://nayax-u.nayax.com/scenario/how-to-for-marshall-configurations-multi-session-with-53447)
For Always Idle (PreSelection sub-flow):
* Marshall - Generic - Marshall - Always Idle
Video and manual regarding the configurations relevant to Always Idle:
[How to for Marshall Configurations | Always Idle Pre-Selection](https://nayax-u.nayax.com/scenario/how-to-for-marshall-configurations-always-idle-pre-54427)
For PreAuthorization:
* Marshall - Generic - Marshall - PreAuthorization
Video and manual regarding the configurations relevant to PreAuthorization
[How to for Marshall Configurations | Pre-Authorization](https://nayax-u.nayax.com/scenario/how-to-for-marshall-configurations-pre-authorization-54263)
5. Click **Save** to apply the configuration.
 ## Configure Session Timeout Parameter
The **Multi-Session Mode** operates only in pre-selection mode but functions similarly to pre-authorization. The transaction flow is akin to a single vending process, with the addition of a **Close Session** command.
If your machine works in the **multi-session mode**, set the session timeout parameters as follows:
1. For the configured machine, click the **General** tab.
2. Go to the **VMC** section.
3. Define the **Session Time Out** to specify the session’s duration:
* **Maximum for Credit Cards:** 23 hours
\*Update: as of 2025, **71** hours\*
* **Maximum for Prepaid Cards:** 72 hours
* **Default:** 60 minutes
* **Minimum:** 1 minute
## Configure Session Timeout Parameter
The **Multi-Session Mode** operates only in pre-selection mode but functions similarly to pre-authorization. The transaction flow is akin to a single vending process, with the addition of a **Close Session** command.
If your machine works in the **multi-session mode**, set the session timeout parameters as follows:
1. For the configured machine, click the **General** tab.
2. Go to the **VMC** section.
3. Define the **Session Time Out** to specify the session’s duration:
* **Maximum for Credit Cards:** 23 hours
\*Update: as of 2025, **71** hours\*
* **Maximum for Prepaid Cards:** 72 hours
* **Default:** 60 minutes
* **Minimum:** 1 minute
 **Session Expiration and Settlement**
Once the session timeout reaches the defined limit, the session expires. In such cases, the settlement amount will correspond to the price sent during the "vend request" command.
Once a session has timed out, the device would settle the transaction on its own and send a "Status" command to the peripheral in order to notify it about the settlement taking place. This would let the peripheral know that it no longer needs to settle said transaction (as it has already been settled), and should he try to settle the already-settled transaction he would get "settlement error" (as the device couldn't find said session to settle it).
Expect the session to expire slightly later than the value you set. The device checks its open sessions once a minute, so settlement can lag the configured timeout by up to a minute:
* A 1 minute timeout expires between 1 minute and 1 minute 59 seconds after the session starts.
* A 5 minute timeout expires between 5 minutes and 5 minutes 59 seconds.
* A 1 hour timeout expires between 1 hour and 1 hour 59 seconds.
## Configure Vend Result Timeout
The **Vend Result Timeout** sets how long the device waits for a vend response from the peripheral ("Vend Approved" or "Vend Failure") after it sends "Vend Approved" to the peripheral.
The maximum value is 65535 seconds, which is 18 hours, 12 minutes, and 15 seconds. If your machine needs a longer window than that, use [Multi-Session](/docs/integrate-pos-device/marshall/payment-flows/marshall-multi-session) instead, which runs on the **Session Time Out** parameter above and reaches considerably longer limits.
## Configure the Acquirer Approval Timeout
While the device waits for the acquirer, it shows "Authorizing, Please wait". The message stays up until a response arrives or the timeout is reached.
When the device can reach the Nayax servers normally, the round trip takes a few seconds, usually no more than five. Communication problems between the device and the servers over GSM, VPN, MQTT, or Ethernet stretch that out, either on the way to the servers or on the way back.
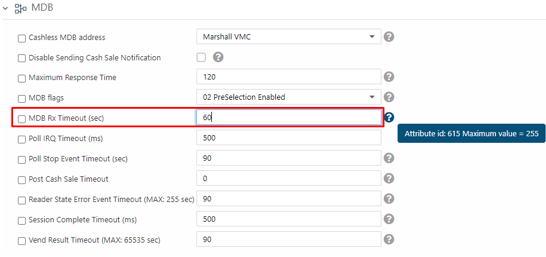
The timeout itself is the **MDB RX Timeout** parameter, and its default value is 60 seconds.
**Session Expiration and Settlement**
Once the session timeout reaches the defined limit, the session expires. In such cases, the settlement amount will correspond to the price sent during the "vend request" command.
Once a session has timed out, the device would settle the transaction on its own and send a "Status" command to the peripheral in order to notify it about the settlement taking place. This would let the peripheral know that it no longer needs to settle said transaction (as it has already been settled), and should he try to settle the already-settled transaction he would get "settlement error" (as the device couldn't find said session to settle it).
Expect the session to expire slightly later than the value you set. The device checks its open sessions once a minute, so settlement can lag the configured timeout by up to a minute:
* A 1 minute timeout expires between 1 minute and 1 minute 59 seconds after the session starts.
* A 5 minute timeout expires between 5 minutes and 5 minutes 59 seconds.
* A 1 hour timeout expires between 1 hour and 1 hour 59 seconds.
## Configure Vend Result Timeout
The **Vend Result Timeout** sets how long the device waits for a vend response from the peripheral ("Vend Approved" or "Vend Failure") after it sends "Vend Approved" to the peripheral.
The maximum value is 65535 seconds, which is 18 hours, 12 minutes, and 15 seconds. If your machine needs a longer window than that, use [Multi-Session](/docs/integrate-pos-device/marshall/payment-flows/marshall-multi-session) instead, which runs on the **Session Time Out** parameter above and reaches considerably longer limits.
## Configure the Acquirer Approval Timeout
While the device waits for the acquirer, it shows "Authorizing, Please wait". The message stays up until a response arrives or the timeout is reached.
When the device can reach the Nayax servers normally, the round trip takes a few seconds, usually no more than five. Communication problems between the device and the servers over GSM, VPN, MQTT, or Ethernet stretch that out, either on the way to the servers or on the way back.
The timeout itself is the **MDB RX Timeout** parameter, and its default value is 60 seconds.
 ## Configure Keep Alive Parameter
The Keep Alive signal ensures consistent communication between the Nayax device and the machine by sending a signal every second. Adjust the parameters to enhance the system's tolerance as follows:
1. For the configured machine, click the **General** tab.
2. Go to the **VMC** section.
3. Set the **Keep Alive Intervals** (in seconds) to define the communication timeframe between the device and the machine (maximum: 255 seconds).
## Configure Keep Alive Parameter
The Keep Alive signal ensures consistent communication between the Nayax device and the machine by sending a signal every second. Adjust the parameters to enhance the system's tolerance as follows:
1. For the configured machine, click the **General** tab.
2. Go to the **VMC** section.
3. Set the **Keep Alive Intervals** (in seconds) to define the communication timeframe between the device and the machine (maximum: 255 seconds).
 **Keep Alive Communication Failure**
If the device doesn’t receive the Keep Alive command within the time defined, then communication is failed, and the device will launch a Pairing process and send the Reset command again.
It is highly recommended to keep it set to 1, and at most not have it above the value of 10- unless you're using VPOSM with Marshall over ETH, and in that case you can use 10 due to LAN limitations.
Read more on that in the [Stability/ starvation issues](/docs/integrate-pos-device/marshall/additional-resources/stablity-issues#/) section.
## Configure Cashless Address
The Cashless Address configuration ensures seamless communication between the machine and the Nayax device for cashless transactions. Follow these steps to set the correct address:
1. For the configured machine, click the **General** tab.
2. Click the **MDB** section.
3. Select the **Cashless MDB address** to **Marshall VMC**.
**Keep Alive Communication Failure**
If the device doesn’t receive the Keep Alive command within the time defined, then communication is failed, and the device will launch a Pairing process and send the Reset command again.
It is highly recommended to keep it set to 1, and at most not have it above the value of 10- unless you're using VPOSM with Marshall over ETH, and in that case you can use 10 due to LAN limitations.
Read more on that in the [Stability/ starvation issues](/docs/integrate-pos-device/marshall/additional-resources/stablity-issues#/) section.
## Configure Cashless Address
The Cashless Address configuration ensures seamless communication between the machine and the Nayax device for cashless transactions. Follow these steps to set the correct address:
1. For the configured machine, click the **General** tab.
2. Click the **MDB** section.
3. Select the **Cashless MDB address** to **Marshall VMC**.
 ## Configure Pre-Selection and Pre-Authorization
Pre-selection and Pre-Authorization settings allow flexible transaction flows tailored to different vending scenarios. Pre-selection enables multi-session operations, while Pre-Authorization focuses on card-based transactions with a defined credit limit. Configure these parameters as needed for your machine’s functionality.
### Pre-Selection - Multi-Sessions
Pre-selection supports Multi-Session operations, where one device can manage multiple transactions in parallel, each comprising two parts: product selection and authorization, and settlement. To configure this:
1. For the configured machine, click the **General** tab.
2. Click the **MDB** section.
3. Select **MDB Flags** and set **PreSelection Enabled** to **Yes**.
## Configure Pre-Selection and Pre-Authorization
Pre-selection and Pre-Authorization settings allow flexible transaction flows tailored to different vending scenarios. Pre-selection enables multi-session operations, while Pre-Authorization focuses on card-based transactions with a defined credit limit. Configure these parameters as needed for your machine’s functionality.
### Pre-Selection - Multi-Sessions
Pre-selection supports Multi-Session operations, where one device can manage multiple transactions in parallel, each comprising two parts: product selection and authorization, and settlement. To configure this:
1. For the configured machine, click the **General** tab.
2. Click the **MDB** section.
3. Select **MDB Flags** and set **PreSelection Enabled** to **Yes**.
 This allows the system to offer product preselection before making a payment.
The **Choose Product Timeout** option is the timeframe that the consumer is required
to choose a product.
When the transaction flow starts with the machine selection (PreSelection), then the **Choose Product Timeout** option must be defined as zero.
4. Click the **Payment** section.
5. Set the Choose Product Timeout to **0** seconds.
This allows the system to offer product preselection before making a payment.
The **Choose Product Timeout** option is the timeframe that the consumer is required
to choose a product.
When the transaction flow starts with the machine selection (PreSelection), then the **Choose Product Timeout** option must be defined as zero.
4. Click the **Payment** section.
5. Set the Choose Product Timeout to **0** seconds.
 This ensures there are no time restrictions on product selection during payment.
### Pre-Selection – Always Idle
Pre-selection in Always Idle mode ensures the machine remains ready for consumers. Use the following steps to configure:
1. For the configured machine, click the **General** tab.
2. Click the **Card Readers** section.
* Set the Transaction Start Method to Product.
This ensures there are no time restrictions on product selection during payment.
### Pre-Selection – Always Idle
Pre-selection in Always Idle mode ensures the machine remains ready for consumers. Use the following steps to configure:
1. For the configured machine, click the **General** tab.
2. Click the **Card Readers** section.
* Set the Transaction Start Method to Product.
 3. Click the **MDB** section.
* Set the **MDB flags** to **Preselection Enabled**.
3. Click the **MDB** section.
* Set the **MDB flags** to **Preselection Enabled**.
 * Set the **MDB Level 3 Optional Features** to **Enable “Always
Idle” state**.
* Set the **MDB Level 3 Optional Features** to **Enable “Always
Idle” state**.
 The **Choose Product Timeout** option is the timeframe that the consumer is required
to choose a product.
When the transaction flow is “Always Idle”, the **Choose Product Timeout** option
must be defined with a value **greater** than zero.
4. Click the **Payment** section.
5. Set the **Choose Product Timeout** desired value.
The **Choose Product Timeout** option is the timeframe that the consumer is required
to choose a product.
When the transaction flow is “Always Idle”, the **Choose Product Timeout** option
must be defined with a value **greater** than zero.
4. Click the **Payment** section.
5. Set the **Choose Product Timeout** desired value.
 ### Pre-Authorization
Pre-Authorization allows the system to secure funds before the vending process begins. Follow these steps to set it up:
1. For the configured machine, click the **General** tab.
2. Click the **MDB** section.
3. Select the **MDB flags** to **Flags Disabled**.
### Pre-Authorization
Pre-Authorization allows the system to secure funds before the vending process begins. Follow these steps to set it up:
1. For the configured machine, click the **General** tab.
2. Click the **MDB** section.
3. Select the **MDB flags** to **Flags Disabled**.
 4. The **Choose Product Timeout** option is the timeframe that the consumer is required
to choose a product.
When the transaction flow starts with card authorization, the **Choose Product Timeout** option must be defined with a value greater than zero.
5. Click the **Payment** section.
6. Set the desired **Choose Product Timeout** value.
4. The **Choose Product Timeout** option is the timeframe that the consumer is required
to choose a product.
When the transaction flow starts with card authorization, the **Choose Product Timeout** option must be defined with a value greater than zero.
5. Click the **Payment** section.
6. Set the desired **Choose Product Timeout** value.
 The **Default Credit** option needs to be configured for Pre-authorization mode.
This is the amount Nayax will charge for card pre-authorization.
7. Click the **Payment** section.
8. Set the desired **Default Credit** value.
The **Default Credit** option needs to be configured for Pre-authorization mode.
This is the amount Nayax will charge for card pre-authorization.
7. Click the **Payment** section.
8. Set the desired **Default Credit** value.
 **Decimal Alignment for Pre-Authorization Value**
The pre-authorization amount must be consistent with the Decimal Place configuration in the system settings. Ensuring proper alignment prevents transaction errors and ensures smooth payment processing.
The Payment Flags option needs to be configured for Pre-authorization mode.
9. Click the **Payment** section.
10. Set the **Payment Flags** to **no flags set**.
**Decimal Alignment for Pre-Authorization Value**
The pre-authorization amount must be consistent with the Decimal Place configuration in the system settings. Ensuring proper alignment prevents transaction errors and ensures smooth payment processing.
The Payment Flags option needs to be configured for Pre-authorization mode.
9. Click the **Payment** section.
10. Set the **Payment Flags** to **no flags set**.
 ## Remove the Cancel Button During Authorization
The device can show an **X** button while a transaction is being authorized, which lets the consumer cancel at that point.
To remove it, set the **VPOST button function** parameter to **VPOS cancel button during authorization**.
## Configure LCD Parameters
To optimize the user experience, configure the LCD messages displayed during idle or disabled states. This includes customizing or disabling the **"Cash Only"** or **"Welcome"** messages to suit your machine's requirements.
## Remove the Cancel Button During Authorization
The device can show an **X** button while a transaction is being authorized, which lets the consumer cancel at that point.
To remove it, set the **VPOST button function** parameter to **VPOS cancel button during authorization**.
## Configure LCD Parameters
To optimize the user experience, configure the LCD messages displayed during idle or disabled states. This includes customizing or disabling the **"Cash Only"** or **"Welcome"** messages to suit your machine's requirements.
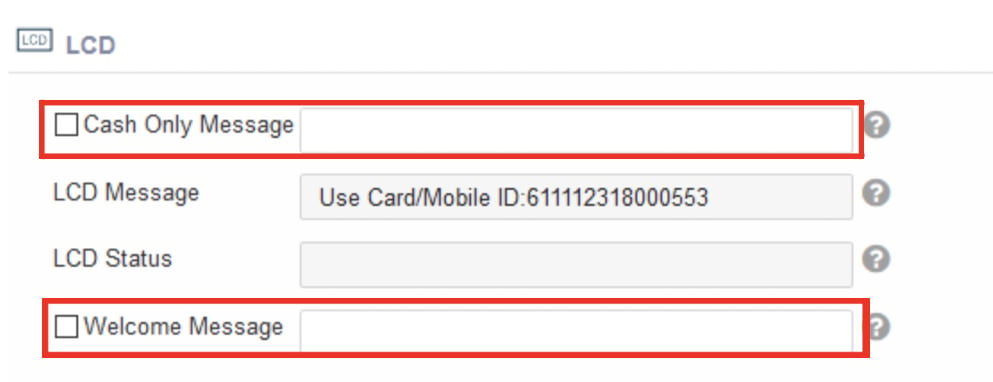 ### Cash Only Message for Amit and VPOS Devices
By default, the VPOS device displays a **"Cash Only"** message when it is disabled or in idle mode. This occurs when the Transaction Start Method is set to start with the machine. For Marshall devices, this is the normal state. However, to ensure better communication, the "Cash Only" message should be customized.
Follow these steps to update the message:
1. Verify that the VPOS device is in idle mode or disabled.
2. Go to the **Machine page**.
3. Click the **LCD** section.
4. Enter an appropriate **Cash Only Message** that suits your needs.
### Cash Only/Welcome Message for Touch Devices
When the Nayax Reader is disabled, the idle screen features animations instructing the consumer to choose a product or service first. Additionally, a "Welcome" message can be customized or disabled as needed.
Follow these steps to update the message:
1. Verify that the Nayax Reader is disabled and the idle screen displays the default animations.
2. To disable the Welcome message, send `@@` to the device in the **Welcome message attribute** using the LCD section on the **Machine page**.
3. To customize the Welcome message, click on the **LCD section** and enter an appropriate message (for example, "Swipe card" to start the transaction).
4. Click **Save** to store the customized Welcome message.
## Enable Alerts
Alerts sent from the SDK only reach Nayax Core when the machine carries the configuration below. Apply it even if your machine is not an EV charger.
### Cash Only Message for Amit and VPOS Devices
By default, the VPOS device displays a **"Cash Only"** message when it is disabled or in idle mode. This occurs when the Transaction Start Method is set to start with the machine. For Marshall devices, this is the normal state. However, to ensure better communication, the "Cash Only" message should be customized.
Follow these steps to update the message:
1. Verify that the VPOS device is in idle mode or disabled.
2. Go to the **Machine page**.
3. Click the **LCD** section.
4. Enter an appropriate **Cash Only Message** that suits your needs.
### Cash Only/Welcome Message for Touch Devices
When the Nayax Reader is disabled, the idle screen features animations instructing the consumer to choose a product or service first. Additionally, a "Welcome" message can be customized or disabled as needed.
Follow these steps to update the message:
1. Verify that the Nayax Reader is disabled and the idle screen displays the default animations.
2. To disable the Welcome message, send `@@` to the device in the **Welcome message attribute** using the LCD section on the **Machine page**.
3. To customize the Welcome message, click on the **LCD section** and enter an appropriate message (for example, "Swipe card" to start the transaction).
4. Click **Save** to store the customized Welcome message.
## Enable Alerts
Alerts sent from the SDK only reach Nayax Core when the machine carries the configuration below. Apply it even if your machine is not an EV charger.
 For the alert IDs your code can send and how to send them, see [General Marshall Events](/docs/integrate-pos-device/marshall/methods-functions/general-marshall-events).
## Define the Prepaid Card(s) in the System
Define the Prepaid Test Card(s) sent to the customer under the **Operator/Machine** so the customer can immediately begin their proprietary integration tests.
Follow these steps to define the Prepaid Card(s):
1. Go to the **Operator/Machine** section in the system.
2. Define the Prepaid Test Card(s) that were sent to the customer.
3. Ensure the customer can begin their proprietary integration tests immediately.
## Additional configurations relevant for VPOSM5
* Marshall over ETH-\
If working with the ETH port instead of the serial port, you need to have the following configurations:
For the alert IDs your code can send and how to send them, see [General Marshall Events](/docs/integrate-pos-device/marshall/methods-functions/general-marshall-events).
## Define the Prepaid Card(s) in the System
Define the Prepaid Test Card(s) sent to the customer under the **Operator/Machine** so the customer can immediately begin their proprietary integration tests.
Follow these steps to define the Prepaid Card(s):
1. Go to the **Operator/Machine** section in the system.
2. Define the Prepaid Test Card(s) that were sent to the customer.
3. Ensure the customer can begin their proprietary integration tests immediately.
## Additional configurations relevant for VPOSM5
* Marshall over ETH-\
If working with the ETH port instead of the serial port, you need to have the following configurations:
 Ensure that you have the matching configuration in the SDK. Meaning commented out the serial port line, and uncommented the ETH port line, and set the port in the same line to be 2025:
```csharp C# theme={null}
//vmc_instance = marshall_init(new pc_port("COM8", 115200));
vmc_instance = marshall_init(new eth_port("192.168.1.117", 2025)); //ensure to set the IP to be the VPOSM5's IP
```
* Supporting the VPOSM5's QR barcode reader:
Should you like to use the device's QR barcode reader, you should set the following Transaction Start Method (include QR in it):
Ensure that you have the matching configuration in the SDK. Meaning commented out the serial port line, and uncommented the ETH port line, and set the port in the same line to be 2025:
```csharp C# theme={null}
//vmc_instance = marshall_init(new pc_port("COM8", 115200));
vmc_instance = marshall_init(new eth_port("192.168.1.117", 2025)); //ensure to set the IP to be the VPOSM5's IP
```
* Supporting the VPOSM5's QR barcode reader:
Should you like to use the device's QR barcode reader, you should set the following Transaction Start Method (include QR in it):
 **Customer Support Assistance**
Should specific help be needed in this matter, please turn to **Customer Support**.
**Customer Support Assistance**
Should specific help be needed in this matter, please turn to **Customer Support**.